When you're starting out painting, it's easy to get discouraged because your results don't seem to match the finished examples that you see from other painters. This is especially true in the middle of the project, as the figure can look like an absolute mess before you're done. Below are pictures from the different stages of the LTPK instructions. Note that I tried to follow the instructions, even when I would have done something differently, as I considered this a learning experience versus "just painting another figure". Hopefully this will help others who might want some insight into the painting process!
Skin Step 1: Basecoat
Once the figure is primed, you'll want to apply a nice, even coat of paint for the skin basecoat. This is usual for what's called the "inside out" approach, where you paint the innermost "layers" first, and work up to the outermost features (which are generally easier to get to).
Skin Step 2: Midtone Shading
The next step is to add a thin midtone layer, leaving the darker basecoat in the recesses to create definition and shading. Apologies for the odd color in the photo; it seems my camera randomly decides not to like my lighting setup!
Skin Step 3: Highlighting
The third step for the skin is to add final highlights, leaving a little of the previous two layers visible. I think my highlight color was a little too light, so it creates a harsher transition than I'd like.
Eyes
The eyes are a multi-step part, and to be honest were kind of a paint in the butt on this figure due to her pronounced brow and cheekbones. The eyes were painted by painting the entire eye socket dark brown, then off-white (leaving an edge of brown for definition). From there, the pupil was added by painting a vertical stripe in the middle of each eye. The most important part here is to make sure your eyes match, so the figure doesn't look googly-eyed!
Hair
Next, the hair is basecoated, and then highlighted to provide a natural sheen. I think highlighting the hair was the biggest thing I'll take away from from this exercise. This is the first time I've tried it, and I really like the "sheen" effect it gives.
Cloth Step 1: Basecoat
With the skin, hair, and eyes done, we move on to the cloth. A basecoat is applied to the top and the loincloth (that's what the instructions call it!).
Cloth Step 2: Shading
Next, shading is applied to the cloth areas. When I initially applied this, I was afraid I had made the shade color way too dark for the top (compare this picture to the previous step). As you'll see, even if that happens it can be corrected by later steps.
Cloth Step 3: Highlighting
The final step involves adding highlights to the cloth areas. I lightened the green, which I had previously over-shaded, and added further highlights to the cloth areas. In addition, I added color to her bracers.
Basing, Details, and Finishing Touches
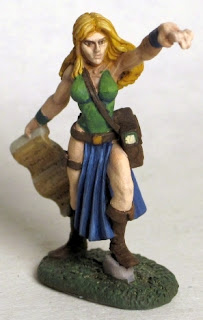
For the final steps, we paint the leather items (boots, belt, book pouch, etc.), the base, and the scroll. Since these areas aren't the focus of this painting kit, they're given less attention. I will say that I'm really pleased with how the scroll turned out.
02621 Laurana, Sorceress
Conclusion: Overall this was a fun project, and I highly recommend the Reaper Learn To Paint Kits! They're a great value just for the paints alone, and they have good instructions that will help you grow your painting skills. I believe this set of LTPKs has been retired, so they may no longer be available except from existing stock in stores, but a Bones LTPK is supposed to be coming soon and should be just as great, if not better!
For Laurana in particular, I'm most pleased with her hair and scroll, and I'm pretty happy with her eyes, as well. As I mentioned above, there are parts that I would have done differently if I were painting the figure "normally", but I endeavored to stick with the instructions to maximize my learning. I think I need more practice with this style of painting skin, but I think it might give a little more control than using a wash to shade a midtone basecoat.
Until next time!
- M:M
- M:M


No comments:
Post a Comment